How I Built a Realistic Ansible Home Lab Using Fedora, CentOS, Ubuntu & ArchLinux
 Before we begin, let's understand what Ansible is
Ansible is an open-source automation tool that lets you manage servers, deploy applications, and orchestrate IT tasks without installing agents on the target systems. Everything works over SSH.
There are two main components:
- Controller node => The machine where Ansible is installed
- Managed nodes (Client nodes) => The remote systems controlled by the Ansible server.
In my setup, I used four systems:
- Fedora (Controller node) -
fedora - Ubuntu Server -
ubuntu - CentOS -
cent - Arch Linux -
arch

As you know Fedora is my main OS, and the other systems are VirtualBox VMs. Even though they’re virtual machines, they behave as separate systems. I gave each system a short hostname so I can easily identify them on the network.
Configuration
1. Configure Client servers
1. Enable SSH
The Ansible use SSH to talk to the nodes. So firstly I want to put all the systems in a single network. Then I can communicate easily via the SSH. For that I can bridge the network easily changing the virtual box network configuration.
Ansible communicates entirely over SSH, so every client system must have SSH installed and running.
I placed all VMs in a bridged network so they can communicate with the Fedora controller directly. We can bridge the network easily changing the virtual box network configuration.
Now we need to enable SSH in client nodes so we can access them from fedora which is the control node(Ansible Server).
Install and enable SSH:
Ubuntu:
Install
sudo apt install openssh-server
Enable
sudo systemctl enable ssh --now
Verify
sudo systemctl status ssh
CentOS:
Already pre installed and enabled by default
Install
sudo apt install openssh-server
Enable
sudo systemctl enable sshd --now
Verify
sudo systemctl status sshd
Arch Linux:
Install
sudo pacman -S openssh
Enable
sudo systemctl enable sshd --now
Verify
sudo systemctl status sshd
| Linux | Default Installed | Package Name | Service Name | Enabled by Default |
|---|---|---|---|---|
| Ubuntu | No | openssh-server | ssh | No |
| CentOS | Yes | openssh-server | sshd | Yes |
| Arch | No | openssh | sshd | No |
Next I want to create a specific user in all the systems. This ensure we can ssh easily to all the client nodes from controller node using the same username.
2. Create a Dedicated User 'ansible' on All Systems
This ensures we use the same login for every node.
fedora/cent/ubuntu/arch add a new user
sudo useradd -m ansible
set password
sudo passwd ansible
3. Add 'ansible' User to Sudo Group
ubuntu
sudo usermod -aG sudo ansible
cent/fedora/arch
sudo usermod -aG wheel ansible
4.Allow Passwordless Sudo
This ensure user 'ansible' can run any command with sudo without typing password
Edits the sudoers file
sudo visudo
Add this line
test ALL=(ALL) NOPASSWD: ALL
Do it on all the client nodes. Commands are the same.
The user ansible now can run any command with sudo without typing a password.
4. Find System IP Addresses
Now we need to know what are the ip's belongs to each of them. To do that we can simply use below command
Use:
ip add
If want we can add a permanent IP address for each one. I'm not going to talk about that in this blog.
Now we know all the IP addresses. We can easily note them down to future use. Because as I said the ansible use ssh to talk to client nodes. We want the client's IP addresses to do that.
My lab IPs:
fedora - 192.168.8.10
ubuntu - 192.168.8.11
cent - 192.168.8.12
arch - 192.168.8.13

Now the client configuration is complete.
2. Configure Controller node
Before install Ansible in our controller node, we can ssh from controller to our clients and check ssh is working properly.
1. Test SSH Connectivity
ssh ansible@192.168.8.11   # ubuntu
ssh ansible@192.168.8.12   # cent
ssh ansible@192.168.8.13   # arch
Now I want to ssh them using their names instead of their IPs. To do that we should edit the hosts file in our controller node.
2. Add Hostnames to /etc/hosts
Edit the hosts file using nano editor
sudo nano /etc/hosts
In nano,
- To save -
ctrl + o - Exit -
ctrl + x
Add following lines
ubuntu    192.168.8.11
cent      192.168.8.12
arch      192.168.8.13
Now we can use above names instead of their IPs.
SSH:
ssh ansible@ubuntu    # ubuntu
ssh ansible@cent      # cent
ssh ansible@arch      # arch
2. Generate SSH keys and get password less access for client nodes
Generate a SSH key-pair
ssh-keygen -t rsa
Verify key generation:
sudo ls /home/ansible/.ssh/
Copy key to all clients:
ssh-copy-id ansible@ubuntu
ssh-copy-id ansible@cent
ssh-copy-id ansible@arch
Test SSH:
ssh ansible@ubuntu=> Successssh ansible@cent=> Successssh ansible@arch=> Success
Now we can install our main tool in our controller node:
3. Install & Configure Ansible on Fedora
- Install Ansible
sudo dnf install ansible
Check version
ansible --version
- Add all nodes into the inventory
Edit the ansible inventory file
sudo nano /etc/ansible/hosts
Add all nodes to the inventory
[lan]
ubuntu
cent
arch

[debian]
ubuntu

[redhat]
cent
Save it. In nano,
- To save -
ctrl + o - Exit -
ctrl + x
Now we are done with the all configurations. Now we can test our lab setup.
Testing the Lab Setup
1. Ping Module Test
ansible -m ping all
This command tells Ansible to ping all managed hosts using the Ansible ping module not the ICMP ping.
-m ping:
The -m flag means module.
ping is an Ansible module that checks:
- Can Ansible SSH into the remote host?
- Is Python available on the remote host?
- Can Ansible run commands there?
This is NOT network ping.
Instead, it sends a small Python script to test connectivity.
all: This means Run this command on all hosts listed in your Ansible inventory file.
After this Ansible will:
- Read the inventory file
- Try to SSH to each host
- Execute the ping module
- Return SUCCESS or FAILED
Using this command we can easily check all the node are working correctly or not.
Output:
ubuntu | SUCCESS => {
    "changed": false,
    "ping": "pong"
}

cent | SUCCESS => {
    "changed": false,
    "ping": "pong"
}

arch | SUCCESS => {
    "changed": false,
    "ping": "pong"
}
If it FAILS
Try to solve these common errors:
- SSH key not added
- Wrong username
- Host unreachable
- Python not installed on remote host
- Permission denied
Actually python is installed default in most of the Linux systems. If not you can install it.
Now we are going to check the python version using ansible:
ansible -m shell -a 'python3 -V' all
Run simple Linux commands with ansible
Check uptime
ansible -a 'uptime' all
Reboot all servers
ansible -a "reboot" all --become
Check disk usage
ansible -a "df -h" all
Check memory usage
ansible -a "free -h" all
Check system hostname
ansible -a "hostname" all
Check OS version
ansible -a "cat /etc/os-release" all
Instead of all we can use a specific host by its name or group
eg: ubuntu, debian, arch
Copy a file to RedHat servers
ansible -m copy -a "src=/tmp/testfile dest=/tmp/testfile" redhat
Install a Nginx package (Debian)
ansible -m apt -a "name=nginx state=present" debian --become
Install a apache2 package (RedHat)
ansible -m yum -a "name=httpd state=present" redhat --become
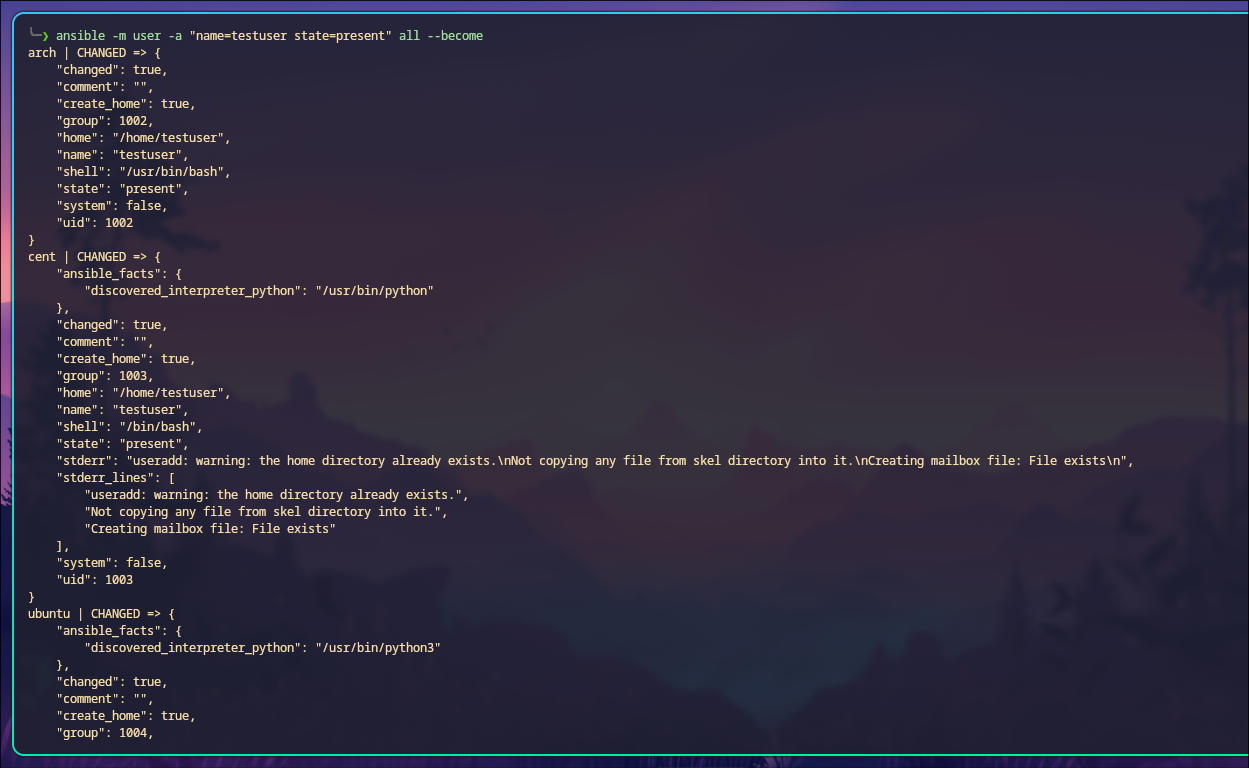
Create a user
ansible -m user -a "name=devuser state=present" all --become
Start Nginx service (Debian)
ansible -m service -a "name=nginx state=started" debian --become
Check service status (Debian)
ansible -a "systemctl is-active nginx" all
Create a directory
ansible -m file -a "path=/opt/mydir state=directory" all --become
Delete a file or directory
ansible -m file -a "path=/tmp/testfile state=absent" all --become
Update all Debian packages
ansible -m apt -a "update_cache=yes upgrade=yes" debian --become
Update all RedHat packages
ansible -m yum -a "name='*' state=latest" redhat --become


Now we have a fully functional multi-distro Ansible practice lab using Fedora, Ubuntu, CentOS, and Arch Linux. With SSH access, passwordless sudo, and a properly configured inventory, we can now run any Ansible module or playbook across all servers.
If you’re curious what Ansible playbooks are, they’re YAML files that define automation tasks. That’s a topic for another blog, I guess...
@PubuduWijesundara
Until next time - keep hacking your way forward.
Related Articles
Cron Job එකක් හරියට ලියමු
Linux Cron Jobs use කරල automated task එකක් නිවැරදිව ලියන විදිහ සරලව සිංහලෙන්
UV සමඟ Python Dependency Management අලුත් විදිහකට
Python projects වල Dependency management සහ Environment management කියන්නේ ලොකු හිසරදයක්ද? Pip, Pyenv සහ Poetry වෙනුවට 10-100x වේගවත් UV tool එක use කරල development workflow එක speed up කරගමු.